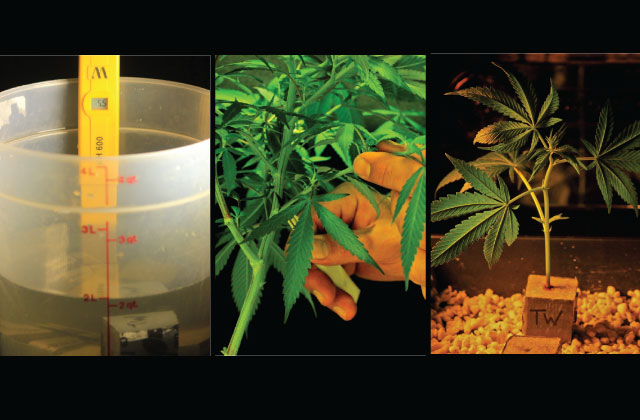
A clone is simply a cutting—i.e., a severed part of the plant—that grows roots and eventually stabilizes as a genetic replica of its donor. This is possible because each of the plant’s individual cells contain all of the information necessary to reconstruct the whole plant, a kind of genetic copy of its “blueprints.” If a cutting is taken and rooted in another location, that cutting has the potential to grow into an exact replica of the mother plant it was taken from. This means that any branch, leaf, stem or flower, no matter how big or small, can generate an infinite number of genetic facsimiles if the conditions are right.
Micro-propagation or “tissue culture” is the relatively new science of growing plants in vitro (in test tubes) from single cells found in certain parts of the plant—a leaf, stem or flower specimen. Due to the high volatility of these specimens, such procedures must be performed in sterile laboratories commonly unavailable to most home-based cannabis growers. This article will explain everything you need to know to confidently clone your plants with a near-perfect success rate using branches as your starting material.
What You Need
All of the items on the following list can be purchased for around $100, and many of them are reusable. Clones don’t require their own light during the process if they’re already in a well-lit veg room. If your clones will be kept outside of the veg room during the rooting process, any fluorescent light will suffice.
Propagation tray*
7″ propagation dome*
10″ x 20″ seedling heat mat*
Perlite (rinsed well with water)*
Cloning gel*
Shot glass*
1½” rockwool cubes
Disposable scalpels
8″ x 8″ glass baking dish*
Distilled water (at room temperature, 70°F)
Liquid cloning solution
Mycorrhizal fungi
Restaurant-style 1-gallon soup container*
pH meter*
pH Up and pH Down solutions
Bleach wipes
99% isopropyl alcohol
Paper towels
Sterile gloves
Duct tape
Permanent marker for labeling
Grow journal
16 oz. plastic cups (red)
16 oz. plastic cups (clear)
*Indicates reusable items
Understanding Your Role
Your biggest responsibility is to make sure that the cuttings are comfortable and stress-free while they are producing roots. Environmental stress and mishandling during this time can lead to all sorts of complications, including mutation, a decrease in yield and/or potency and, in some strains, auto-flowering. The overall health of your clones will determine the future health of your garden.
Remember that cloning is essentially performing surgery on your plants. Every cut made is an open wound that is susceptible to infection and needs to be treated with care. All of the same concerns that a person would have prior to undergoing surgery are equally valid for your plants: “Will I be comfortable during this? Have all the tools been sterilized since the last guy? Will I be in a safe and sterile environment, free from the risk of infection during my recovery?” Your job is to guarantee these things for your plants throughout the entire process.
After the initial process of taking clones, all you can do is to make sure the lights stay on and that it doesn’t get too hot or cold in the room. Many growers make the mistake of overhandling the developing clones, picking them up every day and turning them upside down to see if the roots have appeared yet. Wondering whether the cuttings are too wet or too dry, they may be tempted to give the rockwool cube a little squeeze and end up smashing up the just-forming roots. So, basically, it’s hands off for at least the first five to seven days or so, until you see roots growing out the bottoms of the cubes.
Now that you understand your role, I will explain in 10 easy steps how to produce healthy, robust and vigorous clones, West Coast Masters–style!
1. Sanitize
Before doing anything else, use bleach wipes to sanitize the area in which the tray will sit, as well as all other surfaces within your workspace. Be sure to sterilize all of the tools and equipment using a clean paper towel soaked with 99% alcohol. As a final precaution, sterile gloves should be worn throughout the entire process. Please remember that cleanliness is the key to successful cloning.
2. Setting Up
Plug in the heat mat and place it beneath the 10″ x 20″ propagation tray. Add about a half-inch of rinsed perlite to the tray. The perlite will raise the cubes above the bottom of the tray, preventing them from getting too warm. It also allows airflow beneath the cubes and spurs roots to grow down toward the water below.
Vigorously shake the cloning gel and pour it into the shot glass, filling it halfway. This is a better alternative to placing the cut branches directly into the bottle, which can cause contamination. Position your glass dish, shot glass, cloning gel and scalpels as near as possible to the dome. Keeping everything close within the sanitized area will help reduce stress and the risk of infection for the clones.
3. Preparing the Cloning Solution
The cloning solution is a low-level nutrient mixture that provides the necessary elements for the clones to thrive while developing roots. Using it can cut down on rooting time and result in much healthier, more vibrant clones. Should you decide not to use it, the clones will likely be fine—just less vigorous at first.
If the clones have no source of energy to get them through the week or so that it takes to form roots, they will be forced to consume their own stored energy. In other words, they have to go into survival mode and sacrifice a couple of their own leaves in order to stay alive. That’s no way to start a life, so hook them up with the cloning solution properly by following these steps:
Add a half-gallon of distilled water to the 1-gallon container.
Adjust the pH of the distilled water to 5.5.
Add the rockwool cubes that you plan to use for a single tray. Typically, the maximum capacity for the tray will be from 10 to 12 cubes, depending on the size of the clones.
Let the rockwool soak for five minutes and then pour out the water, being sure to keep all the rockwool cubes within the container. They are now rinsed and pH-adjusted.
Add the remaining half-gallon of distilled water into the container with the cubes.
Following the recommended dosage on the product label, add the cloning solution to the 1-gallon container and stir it around gently with the rockwool cubes.
Adjust the pH to 5.5 and you’re almost ready to start cloning.
4. Setting Up the Cubes in the Tray
Remove the rockwool cubes one by one and space them equally in rows of two along the inside of the tray. Give them plenty of space, as you don’t want the cuttings to touch each other while they’re in the dome. Overlapping leaves will form condensation between them, which could lead to mold and mildew problems.
Pour half of the remaining clone solution into the glass dish (for use in step 6) and pour the other half directly into the propagation tray, where it will settle into the perlite. This liquid will provide the moisture needed to keep up the humidity levels in the dome and give the roots something to look for.
5. Labeling
Countless strains can blame their extinction on faulty labeling. No matter how good your memory is or how well you think you can identify each of your strains, mistakes are made from time to time. The best policy is to label everything. Write the name of the strain directly on the sides of the rockwool cubes and label the outside of the tray using pieces of duct tape. Just to be extra sure that everyone is well accounted for, make a diagram of their arrangement in your grow journal.
6. Choosing and Removing Branches From the Donor Plant
Not all branches are created equal. The branches I select for clones share four characteristics:
They are healthy and vibrant.
The veins in the leaves are clean and translucent.
They have a structure consisting of at least six nodes.
The diameter of their stems is equal to or greater than the diameter of the holes in the rockwool cubes.
Once a suitable branch is chosen, remove it by making a single cut as close to the main stem as possible using a sterile scalpel. This is the first or primary cut of the two you’ll make to create the clone. Place the severed end of the branch into the solution-filled glass dish immediately after the primary cut is made. Exposure to air during this time will cause the cells within the cut part of the branch to oxidize and die. To prevent this, the second and final cut must be made while the branch is submerged in the cloning solution.
7. Making the Final Cut
The final cut should be made through the center of the fifth node from the tip of the branch. The cut should be made at approximately a 45-degree angle to increase the surface area of the wound from which the roots will grow. Once the cut is made, quickly remove the cutting from the water, gently shake off the excess water, and place the cut end into the cloning gel contained in the shot glass. Let the cutting sit in the gel for about 15 seconds and then transfer it into its corresponding rockwool cube.
Resist the urge to push the cut end of the clone down beyond the bottom of the hole in the cube. If the diameter of the cutting’s stem is equal to or greater than the diameter of the hole, it will fit securely enough. Pushing it down into the rockwool can harm the stem and stress out the clone.
Until the clones have developed roots, they will rely heavily on their leaves to absorb the water vapor they need to stay healthy and hydrated. Some growers cut off the tips of the fan leaves in an effort to increase the surface area with which the leaves can absorb water vapor. Using a humidity dome and heating mat provides enough moisture that cutting the leaves is unnecessary. I only do it to reduce the size of overly large leaves instead of removing them entirely.
8. Set It and Forget It
Close the vents on the dome lid and place it back over the tray once all the cubes have been filled. Make sure none of the leaves are pushed up against the dome and that they are not being pinched in between the lid and the tray. Condensation will begin to appear on the inside of the dome as the heating mat increases the temperature and humidity to optimum levels. Be sure to open the vents on the lid after condensation has covered the inside of the dome.
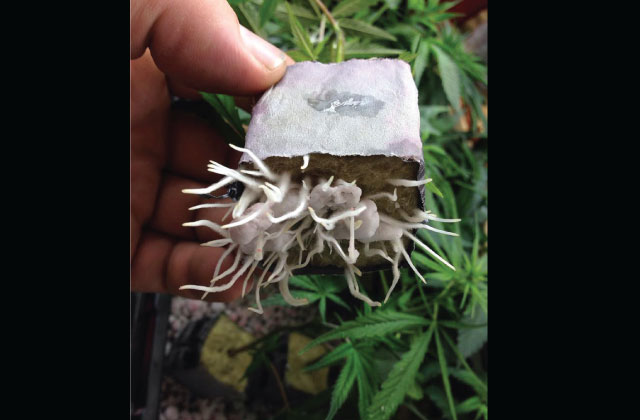
Remember: Don’t mess with the clones. They will be fine without you manhandling them. Just leave them alone until you see roots emerge from the bottom of the cubes. Once the roots are between a half-inch and 1 inch long, the cuttings are ready to transplant.
9. Transplanting Using the West Coast Masters Clear Cup Method
A while back, I thought to myself: “Wouldn’t it be great if I could see through the pots to monitor the development of my clones’ roots? That would allow me to know exactly when it’s time to transplant them into bigger pots.” This led to the invention of the West Coast Masters Clear Cup Method.
It is crucially important to transplant your cuttings before their root tips dry out or they become root-bound. The health of the roots during the clone stage will determine the strength and vigor with which the plant will continue to grow. Either you transplant a cutting on time and the plant continues to thrive, or you miss it and the plant spends the next couple of weeks with hindered growth while trying to recover. The West Coast Masters Clear Cup Method allows you to view the roots, which removes the guesswork and allows you to transplant the clones at the perfect time.
Start by cutting drainage slits around the bottom edges of both the clear and red plastic cups.
Label the red cups with the permanent marker. Include the name of the strain and the date of the transplant.
Fill the clear cups halfway with organic soil.
Sprinkle a small scoop of mycorrhizal fungi over the soil in the clear cups to help the roots quickly acclimate to their new surroundings.
Place the rooted clone in the center of the clear cup and, gently but tightly, pack the soil to just above the top of the rockwool cube.
Place the clear cup containing the newly transplanted clone directly into the corresponding pre-labeled red cup, where they will be ready to be watered.
10. Watering
Since the soil already contains plenty of nutrients, it isn’t necessary to add any fertilizers to the first watering. The clones are very sensitive at this stage and can easily be shocked by overfeeding. This can be a huge setback—one from which it could take the clones weeks to recover. Remember: You are feeding the soil, not the plant.
It is also very important that you do not overwater the clones during their root development. Aside from structural stability, the main reason that plants form roots is because they are looking for water. If you overwater the cups, the roots won’t be in any hurry to grow larger. Also consider the fact that there are only a few roots to consume the water at first anyway. You are better off watering less, but more frequently. This is the advantage of using the Clear Cup Method: You can tell if the soil is wet or dry, and you can monitor the root growth simply by lifting the clear cup out of the red cup.
If everything is done correctly, in about a week’s time the roots will hit the bottom of the cup and the cuttings will be ready for transplant into larger containers.


What type or kind of cloning solution do you recommend in case to do the clonation method, as well I like to no many option in case I can not find it in Colombia